Cisco IOS Zone based Firewall Tutorial
In this tutorial we will learn about Zone Based Firewall, but before digging into details let’s start with basic concepts.
Security zone is a group of interfaces to which a policy can be applied. By default, traffic can flow freely within that zone but all traffic to and from that zone is dropped by default. To allow traffic pass between zones, administrators must explicitly declare by creating a zone-pair and a policy for that zone. Another notice is that traffic originated from the router itself is allowed to pass freely.
Zone-pair allows you to specify a uni-directional firewall policy between two zones. In other words, a zone-pair specifies the direction of the interesting traffic. This direction is defined by specifying a source and destination zone. Notice that we can’t defined a zone as both source and destination zone.
Zone Policy defines what we want to allow or deny to go between zones. For example we just want to allow HTTP while dropping SMTP, ICMP… We have 3 actions “pass”, “drop” and “inspect”. The “pass” and “drop” actions are self-explanatory. The action “inspect” tell the router to use a pre-defined class-map to filter the traffic.
Now enough theory! It’s time for the configuration.
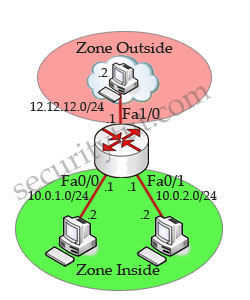
In this scenario, we are going to configure 2 zones “inside” and “outside”. In this example, we will configure two tasks:
+ Only allow ping (icmp) traffic from the INSIDE Zone to OUTSIDE Zone (not vice versa).
Notice: you need to make sure all the networks are reachable with a routing protocol before configuring zone-based-firewall.
First we divide the networks into 2 zones: Inside and Outside.
Create Inside zone and Outside zone
Router(config)#zone security INSIDE
Router(config)#zone security OUTSIDE
(In fact, we don’t need to type “exit” before typing “zone security OUTSIDE”)
Assign IP addresses and apply zones to interfaces
Router(config)#interface fa0/0
Router(config-if)#ip address 10.0.1.1 255.255.255.0
Router(config-if)#no shutdown
Router(config-if)#zone-member security INSIDE
Router(config)#interface fa0/1
Router(config-if)#ip address 10.0.2.1 255.255.255.0
Router(config-if)#no shutdown
Router(config-if)#zone-member security INSIDE
Router(config)#interface fa1/0
Router(config-if)#ip address 12.12.12.1 255.255.255.0
Router(config-if)#no shutdown
Router(config-if)#zone-member security OUTSIDE
Define “interesting” traffic with class-map
Router(config)#class-map type inspect match-any CLASS_MAP_IN_TO_OUT
Router(config-cmap)#match protocol icmp
In the class-map configuration, we have two most used parameters: match-any and match-all. If match-any is used, traffic must meet only one of the match criteria in the class map. In contrast, if match-all is specified, traffic must match all the criteria of that class-map. In this example we just want to check if it is “icmp” protocol or not so we can use either “match-any” or “match-all”. Maybe you will ask: “How can I use “match-all” as a packet can’t match 2 or more protocols?” The answer is we can use “match-all” in order from more specific to less specific protocol. For example:
match protocol http
match protocol tcp
We defined what traffic we want to monitor. Now we need to specify what we want to do with that traffic.
Router(config)#policy-map type inspect POLICY_MAP_IN_TO_OUT
Router(config-pmap)#class type inspect CLASS_MAP_IN_TO_OUT
Router(config-pmap-c)#inspect
I want to explain more about the “inspect” action in the policy-map POLICY_MAP_IN_TO_OUT. Unlike the “drop” and “pass” actions, when using this action we need to tell the router which class-map the router must look up for the “interesting traffic”.
Notice that at the end of each policy-map there is a hidden class class-default that drops “all other” traffic by default, just like the implicit “deny all” at the end of each access list. Something like this:
class class-default
drop
Ok, mostly done! The last thing is specifying the direction of this firewall (recall that the Zone based Firewall is uni-directional). We do this with a zone-pair.
Router(config)#zone-pair security ZONE_PAIR_IN_TO_OUT source INSIDE destination OUTSIDE
Router(config-sec-zone-pair)#service-policy type inspect POLICY_MAP_IN_TO_OUT
As you see, we define the direction by specifying the source and destination. Of course traffic will flow from the source to the destination. In this case we only permit traffic from INSIDE to OUTSIDE.
A big notice is “return traffic is allowed by default”. So if a policy permits the traffic in the outbound direction, it also permits the return traffic in the inbound direction.
It is not possible for traffic to flow between an interface that is a member of a security zone and one that is not a member of a security zone, because a policy can be applied only between two zones. If an interface on a router cannot be part of a security zone or firewall policy, it may be necessary to put that interface in a security zone and configure a “pass all” policy between that zone and other zones where traffic should flow.
In conclusion to configure Zone Based Policy Firewall we need to do these steps:
+ Specify zones.
+ Specify what type of traffic (protocol) we want to monitor with a class-map.
+ Specify what action we want to do (drop, permit or inspect) with a policy-map.
+ Specify the direction we want to apply the filter with a zone-pair.
In this example we configured:
+ Zones: INSIDE and OUTSIDE
+ Type of traffic: icmp (ping)
+ Action: inspect (because we don’t allow or deny all types of traffic so we must use “inspect” action)
+ Direction: INSIDE to OUTSIDE
We can say this firewall in plain text: “only allow icmp traffic from INSIDE to OUTSIDE, drop other traffic”.
Now if we make a ping from a PC (INSIDE) to 12.12.12.2 (OUTSIDE) then it works well
(INSIDE)#ping 12.12.12.2
!!!!!
but a ping from 12.12.12.2 (OUTSIDE) to a PC (INSIDE) will be dropped
(OUTSIDE)#ping 10.0.1.1
…..